Article version 1.1
Introduction
React needs no introduction. It is one of the most sought-after frameworks in the world. Of course, in the presentation layer frameworks category. Regardless of the chosen pattern, according to which the application is created, the presentation layer needs to be fed with data. Therefore, each “React app” requires something to store and provide data on an ongoing basis. It could be a server, it could be the famous Redux, it could be Observables. The latter is operated by the RxDB database. In this article, we will check how it works in tandem with React on the example of a simple ToDo List application and whether such a solution makes sense.
The premise of this article is, dear Reader, that you know the basics of React. Other technologies will be described to the extent required by the example application, and exploring their secrets will remain the topic of our next meetings.
Oh! And TypeScript will be used!
Observables
However, before we start delving into our sample application, let’s recall what Observables are and how they work.
Observable is a class introduced by ReactiveX – the concept of handling asynchronous collections. The implementation that we need is RxJS. We can find it at https://rxjs.dev/ – there is also a detailed description of the Observables.
Observables are asynchronous collections. They can also be called data streams. They are to synchronous collections what Promise is to any single value. They allow you to handle data provided by the push method, not the pull method. This is well illustrated in the table below.
| Single Value | Multiple Value / Collection | |
| Pull | Function | Iterator |
| Push | Promise | Observable |
We will not create them. This is what RxDB will do, so let’s just look at how to handle the values provided by Observable.
$.subscribe({
    next(it) {
        // handle next value here
    },
    complete() {
        // handle end of all values
    },
    error(err) {
        // handle error
    }
Object passed to the .subscribe() methodis fairly clear. It has three handlers for the three possible actions the Observable can take. It can push the next value (.next()), it can report that the collection is finished (.complete()), and it can also report that an error occurred (.error ()) when trying to push the next value. If we only need consecutive value handling, we can use the following .subscribe() method signature:
subscribe(next: (value: T) => void): Subscription

// example:

$.subscribe(it => {
    // handle next value here
});
Subscription is returned. It is used to manage the subscription, in particular, to end it and unregister handlers.
const subscription = $.subscribe(/* ... */);

subscription.unsubscribe()
This knowledge should be enough for us to use Observables in tandem with React. As you probably already guessed, using Observables we will provide new versions of the application state, which will be rendered by React.
Create React App
We will create our example application using the Create React App generator available here: https://create-react-app.dev/ . It creates a simple React application with basic scripts to support it: start (for development), build (for building a production version), test (for testing). It manages the entire process of building the application, thanks to which we will be able to focus on the merits.
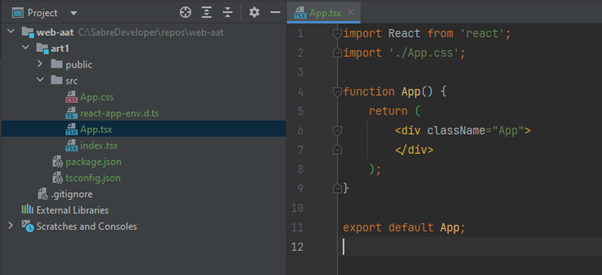
After cleaning the application of redundant files, our base version looks like this:

Index.tsx looks like this:
import React from 'react';
import ReactDOM from 'react-dom/client';
import App from './App';

async function main() {
    const root = ReactDOM.createRoot(
        document.getElementById('root') as HTMLElement
    );

    root.render(
        <React.StrictMode>
            <App/>
        </React.StrictMode>
    );
}

main().then(() => console.log(`App started`));
Our application will be a simple ToDo list, i.e. a list of tasks with the date they were created and a simple form that allows you to add them.
RxDB
A bit unusual, when it comes to a React application, we will start creating it by preparing the state, i.e. the database that will feed the presentation layer. Well, we must finally have something to show before we start doing it! Before we talk about RxDB, let’s install it along with RxJS to support Observables:
npm i rxdb rxjs --save
Let’s also create an instance of it in the main() function from the index.tsxfile :
import {createRxDatabase} from 'rxdb';
import {getRxStorageMemory} from 'rxdb/plugins/memory';

const db = await createRxDatabase({
    name: 'todo_db',
    storage: getRxStorageMemory()
});
The first option we used is simple to understand. Name is the name of the database. There’s nothing magical about it, except that RxDB follows the PouchDB naming convention – so we shouldn’t use camelCase, but snake_case .
The second one may cause uncertainty because we did not say that RxDB is not basically an independent database, but a common access interface to a specific database implementation prepared as RxStorage. The list of available RxStorages can be seen in the RxDB documentation, specifically at: https://rxdb.info/rx-storage.html. We will use the memory version of the database created with plain old JS objects.
You can read about the structure and details of RxDB here: https://rxdb.info in the meantime, we will tell you about the collection that we need to create to store information about tasks from the ToDo list. A collection as understood by RxDB is a collection of documents that contain some information. The collection document definition is based on the JsonSchema format.
Let’s assume that each of the tasks in the ToDo list will be represented by a document from the tasks collection in RxDB. Let each such document have a mandatory text attributeand a creation date stored as a timestamp. Each document must also have an attribute that is its unique identifier – id.
The definition of the document storing the task looks like this:
const taskSchema = {
    title: 'task schema',
    version: 0,
    description: 'describes task from todo list',
    primaryKey: 'id',
    type: 'object',
    properties: {
        id: {
            type: 'string',
            maxLength: 32
        },
        timestamp: {
            type: 'number'
        },
        text: {
            type: 'string'
        }
    },
    required: ['id', 'timestamp', 'text']
};
Adding a collection to RxDB looks like this:
await db.addCollections({
    tasks: {
        schema: taskSchema
    }
});
The collection is accessed through the attribute named after the collection on the database object, e.g.:
db.tasks
People familiar with TypeScript will surely ask what about the types and the support for the IDE. We will discuss it later in the article.
Let’s add some example tasks so that our list is not empty
await db.tasks.bulkInsert([
    {
        id: `${Math.random()}`,
        timestamp: Date.now(),
        text: 'Example task #1'
    },
    {
        id: `${Math.random()}`,
        timestamp: Date.now(),
        text: 'Example task #2'
    }
]);
As we can see, it is simple. Documents are passed as regular JS objects. There are several methods for inserting new objects – .bulkInsert () can add several documents in one go, so we used it.
Our basic version of the database is ready!
Data extraction from RxDB
To get to the data in RxDB, we need to create an RxQuery object . One way is to use the .find() methodon a collection object, e.g.
const query = db.tasks.find();
This method takes an object specifying the search criteria as an argument. Details are available here: https://rxdb.info/rx-query.html . We do not have to define any criteria, because we are interested in the list of all tasks.
To get the list, we need to call the .exec () method:
const tasks = await query.exec();

console.log(tasks);
// => (2) [RxDocumentConstructor, RxDocumentConstructor]

console.log(tasks.map(it => it.text));
// => (2) ['Example task #1', 'Example task #2']
Voila! In this way, we selected a list of documents from the database. We could now pass this list to the App component and render it, but… adding a new task will not affect what we see on the screen. It is not Observable after all! RxDB, however, gives a simple answer to how to get such Observable.
const tasks$ = query.$;

tasks$.subscribe(tasks => {
    console.log(tasks.map(it => it.text));
    // => (2) ['Example task #1', 'Example task #2']
});
With this Observable at our disposal, we can pass it to the App and use it as a data source!
Types
Before we draw a list of tasks, however, let’s cover our collection and documents with types. It will be easier for us to use them. Let’s use the instructions from the page: https://rxdb.info/tutorials/typescript.html. In the example below, I have saved the comments from the documentation to make it easier to understand what is happening. I also kept the convention for the names of types and variables.
Let’s create the types in the tasksSchema.ts file:
import {ExtractDocumentTypeFromTypedRxJsonSchema, RxJsonSchema, toTypedRxJsonSchema} from 'rxdb';

const taskSchemaLiteral = {
    title: 'task schema',
    version: 0,
    description: 'describes task from todo list',
    primaryKey: 'id',
    type: 'object',
    properties: {
        id: {
            type: 'string',
            maxLength: 32
        },
        timestamp: {
            type: 'number'
        },
        text: {
            type: 'string'
        }
    },
    required: ['id', 'timestamp', 'text']
} as const; // <- it is important to set 'as const' to preserve the literal type

const schemaTyped = toTypedRxJsonSchema(taskSchemaLiteral);

// aggregate the document type from the schema
export type TaskType = ExtractDocumentTypeFromTypedRxJsonSchema<typeof schemaTyped>;

// create the typed RxJsonSchema from the literal typed object.
export const taskSchema: RxJsonSchema<TaskType> = taskSchemaLiteral;
Let’s use them in index.tsx and pass the immediately observable RxQuery to the App:
type ToDoDatabase = RxDatabase<{tasks: RxCollection<TaskType>}>

async function main() {
    const db: ToDoDatabase = await createRxDatabase({ /* … */ });

// …

    root.render(<App tasks$={db.tasks.find().$}/>);
}
React and Observable Hooks
Let’s go to the App.tsx file and extend our component. First, let’s add tasks $ to the props:
type AppProps = {
    tasks$: Observable<TaskType[]>
}
Remember that the submitted Observable will provide us with all tasks, not individual tasks, so the type we expect is TaskType[] .
In the component function, we cannot subscribe directly because we need to return the JSX element right away, synchronously – we cannot wait for the data to arrive. Hooks come in handy, specifically, useObservableState() from the Observable Hooks library, which can be found here: https://observable-hooks.js.org.
npm i observable-hooks --save
After installation, we can use the hook and print a list:
export default function App(props: AppProps) {
    const tasks: TaskType[] | undefined = useObservableState(props.tasks$);

    return (
        <div className="App">
            <ul>
                {tasks?.map(it => <li key={it.id}>{it.text} at {new Date(it.timestamp).toISOString()}</li>)}
            </ul>
        </div>
    );
}
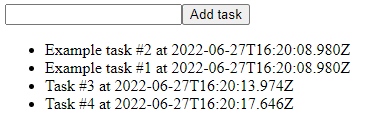
Hook magically turns an object of the Observable type into a specific value. We must note that this value can also be undefined when the data is not yet available, so this case should also be considered. We can see the result on the screen:

The order of displayed tasks is random. If we would like to change it, we should go back to index.tsx and add the sort criterion to the query we created, e.g .:
const tasks$ = db.tasks.find({
    sort: [{timestamp: 'asc'}]
}).$;

root.render(<App tasks$={tasks$}/>);
A list containing the name of the attribute and the sort order is passed to the sort attribute. The sorted tasks look like this:

Nothing has changed as the timestamp is identical in both cases. It happens 🙂 To check if a new task will be added at the bottom, we need to add a simple form for adding it. We got to that stage quickly, didn’t we?
const addTaskHandler: FormEventHandler<HTMLInputElement> = (e) => {
    const el = document.getElementById('new-task') as HTMLInputElement;
    // ... add task to DB here
    el.value = '';
};

return (
    <div className="App">
        <form>
            <input id={'new-task'} defaultValue={''}/>
            <input type={'button'} value={'Add task'} onClick={addTaskHandler}/>
        </form>
// ...
And we have a simple form:

Now we need to pass a function that will add an item to the database:
// App.tsx

type AppProps = {
    tasks$: Observable<TaskType[]>,
    addTask: (text: string) => void
}

// …
    const addTaskHandler: FormEventHandler<HTMLInputElement> = (e) => {
        const el = document.getElementById('new-task') as HTMLInputElement;
        props.addTask(el.value)
        el.value = '';
    };

// index.tsx

function addTask(text: string): void {
    db.tasks.insert({
        text,
        timestamp: Date.now(),
        id: `${Math.random()}`
    });
}

root.render(<App addTask={addTask} tasks$={tasks$}/>);
It’s the entire app!

Were you expecting something complicated? Any heavy tricks? Nothing of that! Using the Observables with React is child’s play!
There are just a few things to keep in mind:
– Observable will almost always return undefined as the first value.
– Do not create a data source in a component that uses it – otherwise React will loop!
– Sorting, filtering etc. should be done directly on the database.
– With the operators available in RxJS, you can do a lot of data manipulation!
Summary
Congratulations on getting to this point!
In the article, we managed to connect a data source based on Observables with React. Any source other than RxDB based on the same concept will work just as well. However, the use of a database allows you to separate the data layer from the presentation layer and operate both independently in the easiest possible way.
What was not seen in this article is the support for TypeScript and IDE. You couldn’t see it because it’s very good. It prompts types where they should be prompted, with minimal effort to create types for a collection. It is also a great plus for maintaining data quality in any application.
What about the point? Does it make sense to replace Redux with Observables? Is the code from the combination of React and RxDB more readable? Is it easier to manage? This question, dear Reader, you have to answer for yourself, and if you have traced the code created in this article, you have probably already answered yourself. Hope the answer is yes.

Łukasz Karpuć – graduate of the Kielce University of Technology and Maria Curie-Skłodowska University. Sabre developer for many years. Formerly: web application backend; today: frontend logic in SPA applications. Boomer, keeper of three cats, opponent of changes to the offside rules.
PS. Try to change RxStorage to DexieJS and check the persistent IndexedDB in Web Tools.
PS2. You can get sources of this sample application here: https://github.com/lukaszknet/demos/tree/main/react-and-rxdb – just remember that it is just PoC, not well-crafted production-ready application so the code is dirty.


